
What Is Intel Optane? 7 Key Benefits and Activation Tips
Intel Optane Memory is a cutting-edge technology that enhances system performance by acting as a bridge between traditional storage drives and system memory (RAM). Utilizing 3D XPoint technology, it offers faster data access, resulting in quicker boot times, faster application launches, and an overall improved user experience. This blog post covers the key benefits of Intel Optane Memory and includes a complete user guide for easy activation and setup.
Table of Contents
Modern computers are expected to deliver fast performance, but many systems still struggle due to slow storage speeds. Even with a decent processor and sufficient RAM, a traditional hard drive can significantly limit overall responsiveness. This is where Intel Optane Memory becomes an effective solution. It is designed to bridge the performance gap between storage and memory, providing a noticeable boost without requiring a full hardware upgrade.
In this comprehensive guide, you will learn what Intel Optane Memory is, how it works, its benefits, compatibility requirements, and how to install and activate it on both laptops and desktop PCs. This guide also covers systems that already include Optane Memory as well as those that can be upgraded.
What is Intel Optane Memory
Intel Optane Memory is a non-volatile memory technology developed to accelerate system performance by caching frequently used data and applications. Unlike traditional storage devices such as hard disk drives or even solid-state drives, Optane Memory works alongside your existing storage rather than replacing it.

The technology is based on advanced memory architecture that enables faster data access and reduced latency. When you repeatedly use certain applications or files, Optane Memory learns these patterns and stores that data for quicker retrieval. As a result, applications load faster, the system boots more quickly, and overall performance improves.
How Intel Optane Memory Works
Intel Optane Memory functions as a smart caching layer between the processor and the primary storage device. Instead of accessing data directly from a slower hard drive every time, the system retrieves frequently used data from the Optane module.
Over time, the system adapts to your usage habits. For example, if you regularly open a browser or specific software, those programs are cached. This significantly reduces loading time and improves system responsiveness. The more you use your system, the more optimized the performance becomes.
Benefits of Intel Optane Memory
One of the most noticeable advantages of Intel Optane Memory is the improvement in speed. Systems that rely on traditional hard drives can experience a dramatic reduction in boot time and application loading time. This makes everyday tasks feel much faster and smoother.
Another important benefit is enhanced multitasking. When multiple applications are running simultaneously, systems without caching often experience lag. Optane Memory reduces this issue by enabling faster data access, allowing users to switch between tasks more efficiently.
System responsiveness also improves significantly. Whether you are browsing, editing videos, or working with large files, the overall experience becomes more fluid. This is especially beneficial for users who perform data-intensive tasks regularly.
From a cost perspective, Intel Optane Memory is an affordable upgrade option. Instead of replacing a hard drive with a more expensive SSD, users can add Optane Memory to achieve comparable performance improvements in many scenarios.
Intel Optane Memory for Laptops and Desktop PCs
Intel Optane Memory is available for both laptops and desktop systems, but the installation and upgrade flexibility differ.
In laptops, Optane Memory is often pre-installed in modern devices from major manufacturers. However, upgrading a laptop depends on whether it has an available M.2 slot and supports the technology. Many thin and lightweight laptops benefit from Optane because it enhances performance without requiring additional storage replacement.
In desktop PCs, installation is generally easier and more flexible. Users can install Optane modules directly into the motherboard’s M.2 slot. Desktop systems also allow better customization, making them ideal for combining HDD storage with Optane acceleration.
Systems That Already Have Intel Optane Memory
Many modern laptops come with Intel Optane Memory pre-installed. To check whether your system includes it, you can open Device Manager and look under disk drives. Another reliable method is using the Intel Rapid Storage Technology software, which detects and manages Optane modules.
If your system already includes Optane Memory but it is not enabled, you can activate it through the software and BIOS settings to start benefiting from improved performance.
Systems That Support Intel Optane Memory
Not all systems are compatible with Intel Optane Memory. Compatibility depends on several hardware and software requirements. The system must have an Intel processor from the 7th generation or newer, along with a compatible motherboard that supports Optane technology.
Additionally, the motherboard must include an M.2 slot capable of supporting NVMe modules. The operating system must be a 64-bit version of Windows 10 or Windows 11. BIOS support is also essential, as Optane needs to be enabled at the firmware level before it can function.
It is important to note that systems based on AMD processors do not support Intel Optane Memory.
How to Install Intel Optane Memory
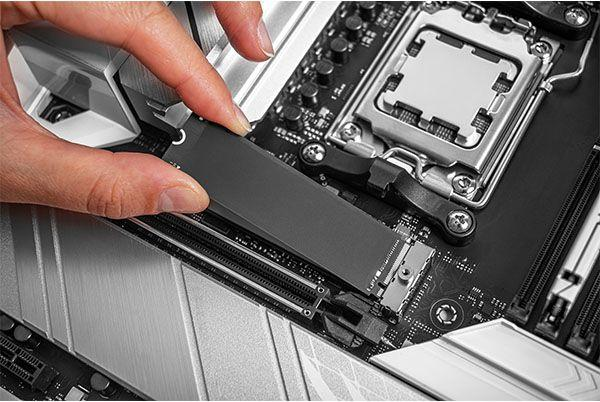
Installing Intel Optane Memory involves both hardware and software steps. For desktop computers, the process begins by powering off the system and opening the cabinet. The Optane module is then inserted into the M.2 slot on the motherboard and secured properly. After reassembling the system, it can be powered on again.
For laptops, installation is slightly more complex due to limited accessibility. The back panel must be opened carefully, and the module inserted into the available M.2 slot. Not all laptops support upgrades, so checking compatibility beforehand is essential.
How to Activate Intel Optane Memory
After installation, activation is required to start using Intel Optane Memory. This process begins by entering the BIOS during system startup. Within the BIOS settings, users need to navigate to the storage configuration section and enable the Optane Memory option.
Once enabled, the next step is installing Intel Rapid Storage Technology software. This application allows users to manage and configure Optane Memory.
After installing the software, users can open it and select the storage drive they want to accelerate. The software provides an option to enable Optane Memory, and once selected, the system needs to be restarted. After rebooting, the system begins using Optane Memory automatically.
Activating Optane on Pre-installed Systems
If your laptop or desktop already includes Optane Memory, activation is usually simpler. In such cases, users only need to ensure that BIOS settings are configured correctly and that Intel Rapid Storage Technology software is installed.
Once the software is launched, it detects the Optane module and provides an option to enable acceleration. After confirmation and a system restart, the feature becomes active.
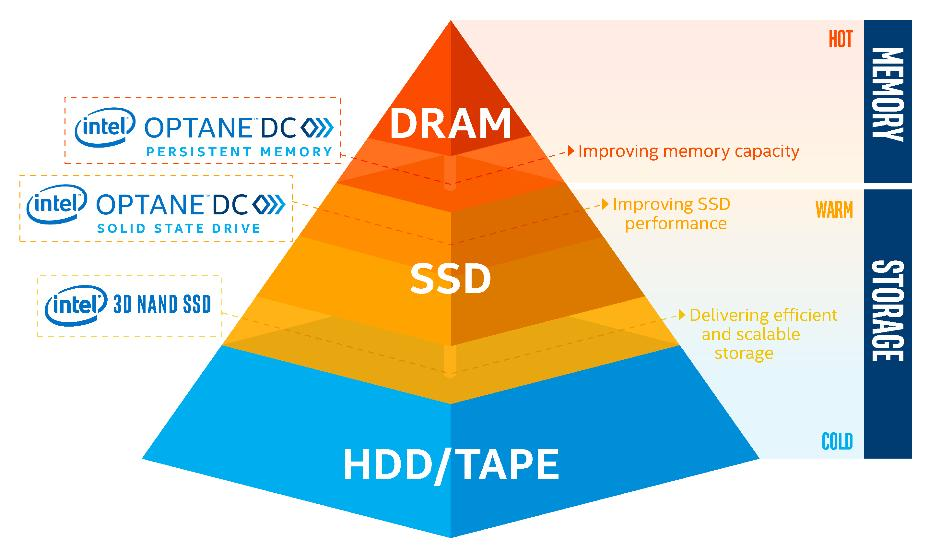
Comparison Between HDD, SSD and Optane Memory
Traditional hard drives offer large storage capacity at a lower cost but suffer from slow performance. Solid-state drives provide faster speeds but are generally more expensive. Intel Optane Memory does not replace either of these but works as an enhancement layer.
When used with a hard drive, Optane significantly improves performance, making the system feel closer to an SSD-based setup. When used with an SSD, the performance gain is less noticeable but still beneficial in certain scenarios.
Common Issues and Troubleshooting
Users may sometimes encounter issues while activating Intel Optane Memory. One common problem is the “No Compatible Disk” error, which usually occurs when the selected drive does not meet requirements or is already configured with another caching system.
Another issue is the absence of Optane options in BIOS. This can often be resolved by updating the BIOS or ensuring that the system meets all compatibility requirements.
If the software fails to detect the module, reinstalling Intel Rapid Storage Technology or updating drivers can help resolve the problem.
Frequently Asked Questions
One of the most common questions is whether Intel Optane Memory works with SSDs. While it does work, the performance improvement is not as significant as it is with hard drives.
Another question is whether Optane Memory is better than an SSD. The answer is no, as Optane is designed to complement storage rather than replace it.
Users also often ask if Optane can be installed in any laptop. The answer depends on compatibility, as only systems with supported hardware and an available M.2 slot can use it.
There is also curiosity about whether Optane increases RAM. It does not increase RAM capacity but improves storage performance, which can indirectly make the system feel faster.
Conclusion
Intel Optane Memory is a practical and cost-effective solution for improving system performance, especially for users who rely on traditional hard drives. It enhances speed, reduces loading times, and improves overall responsiveness without requiring a complete storage upgrade.
Whether you are using a laptop or a desktop PC, Optane Memory can significantly improve your computing experience if your system supports it. For systems that already include Optane, activating it can unlock hidden performance potential. For those considering an upgrade, it offers a balanced approach between cost and performance.
By understanding its functionality and following the correct installation and activation steps, users can make the most of Intel Optane Memory and achieve a smoother, faster, and more efficient system performance.
Also Read


