

Windows Spotlight Images: Easy Ways to Download on Windows 11 & 10

Quick answer: You can save Windows Spotlight images by copying them from Windows’ local cache to a normal folder. For lock-screen Spotlight, open %LOCALAPPDATA%\Packages\Microsoft.Windows.ContentDeliveryManager_cw5n1h2txyewy\LocalState\Assets. The files have no extensions, so copy them first and verify that they are real JPEG images before adding a .jpg extension. The PowerShell method below checks the JPEG signature, decodes the image, filters small files, and skips duplicates.
This guide covers Windows 11 and Windows 10, including the separate desktop Spotlight feature in Windows 11. You do not need a third-party downloader, administrator access, or to modify anything inside the original Windows cache. Follow the steps below to save Windows Spotlight images without disturbing the files Windows uses.
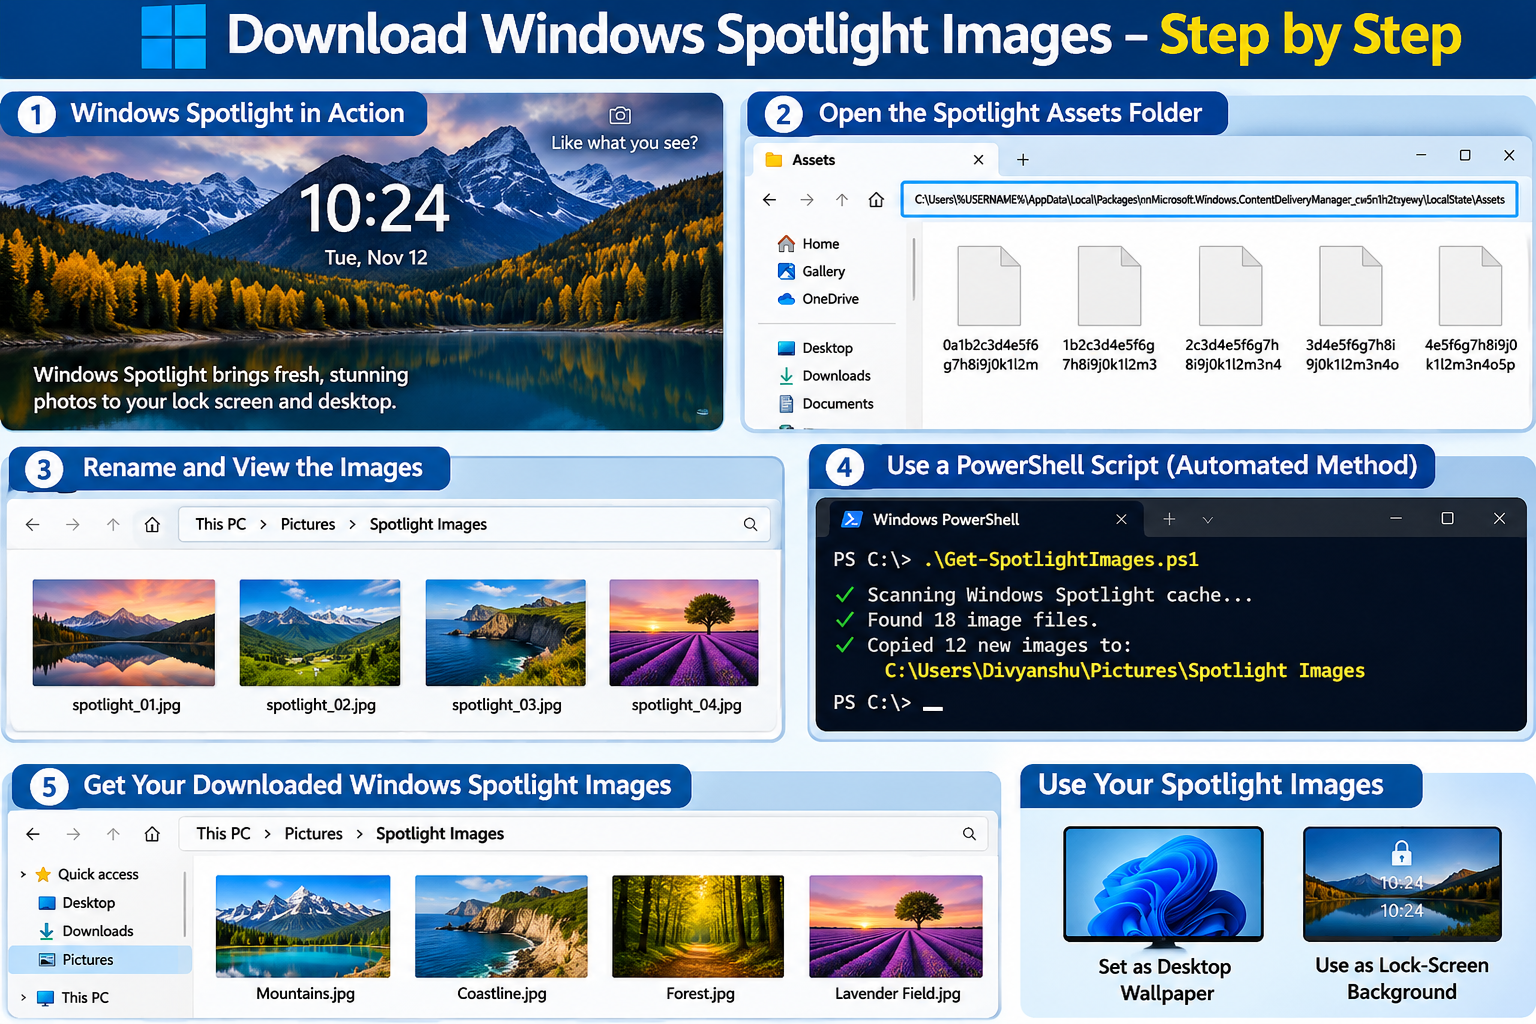
Table of Contents
What is Windows Spotlight?
Windows Spotlight is Microsoft’s rotating background feature. It downloads selected photographs and artwork and displays them on supported Windows lock screens. On supported Windows 11 installations, you can also choose Spotlight as the desktop background. Depending on the experience, Windows may show a short description, a location, or a link to learn more about the picture.
The pictures are delivered to your PC and cached locally so Windows can display them without downloading the same file every time. The cache is managed by Windows, not designed as a personal photo library. That is why you may see long filenames, files with no extension, thumbnails, and other assets mixed together.
Lock-screen Spotlight versus desktop Spotlight
These two options are related, but they are not interchangeable:
- Lock-screen Spotlight: Changes the image shown before you sign in. In Windows 11, open Settings > Personalization > Lock screen. In Windows 10, open Settings > Personalization > Lock screen and choose Windows spotlight under Background.
- Desktop Spotlight: Changes the wallpaper behind your desktop icons. On supported Windows 11 versions, open Settings > Personalization > Background and choose Windows spotlight under Personalize your background. This desktop option is not the same as the Windows 10 lock-screen setting.
Microsoft documents the Spotlight choices in its lock-screen personalization guide. If you are setting up Windows 11 for the first time, our Windows 11 tips and setup guide may also be useful.
Method 1: Find and save Windows Spotlight images manually
This is the simplest approach if you only want to save one or two pictures. It works on Windows 10 and Windows 11 for the traditional lock-screen Spotlight cache, making it a straightforward way to download Windows Spotlight images without installing extra software.
Step 1: Make sure Windows Spotlight is enabled
Open Settings with Windows + I. Go to Personalization > Lock screen and select Windows spotlight. Lock the computer with Windows + L to confirm that a Spotlight picture appears. If you have only just enabled the feature, give Windows time and an internet connection to download its first images.
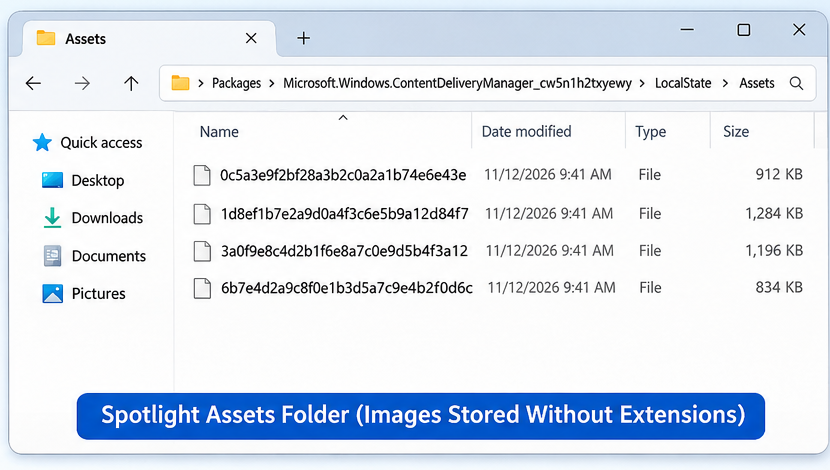
Step 2: Open the Spotlight Assets folder
Press Windows + R, paste the following path into the Run box, and press Enter:
%LOCALAPPDATA%\Packages\Microsoft.Windows.ContentDeliveryManager_cw5n1h2txyewy\LocalState\AssetsFile Explorer should open the Assets folder. If you prefer, paste the same path into File Explorer’s address bar. The folder is inside your Windows user profile, so the contents can differ from one Windows account to another.
Step 3: Copy the files to a separate folder
Create a folder such as Pictures\Spotlight. In the Assets folder, switch File Explorer to Details view and sort by Size. Larger files are more likely to be full-size photographs, while very small files are often thumbnails, icons, or supporting assets.
Select the candidates you want and press Ctrl + C. Open your new Spotlight folder and press Ctrl + V. Copy the files; do not move, rename, or delete anything in the original Assets folder. Windows owns that cache and may refresh it at any time.
Step 4: Check the file type before adding .jpg
This is an important detail that many short tutorials skip: changing a filename does not convert the data inside a file. A file named something.jpg is not necessarily a JPEG. If you append .jpg to an icon, a thumbnail in another format, or a damaged file, it will not magically become a photograph.
For a manual check, open PowerShell in your copied folder and run Format-Hex -Path .\YOUR-FILE-NAME | Select-Object -First 1, replacing the example name with the actual filename. A JPEG normally begins with the hexadecimal signature FF D8 FF. This is a useful first check; the PowerShell script in the next section also asks Windows’ image decoder to open the file before saving it.
Once you have confirmed that a copied file is a JPEG, rename that copy and add .jpg to its name. Keep the original cache untouched. If the file does not open in Photos after verification, do not keep changing extensions—try another candidate.
Method 2: Extract verified Spotlight images with PowerShell
If you have many files to sort through, PowerShell is quicker and safer than renaming everything by hand. It is especially useful when you want to collect Windows Spotlight images in batches. The script below is designed for Windows 10 and Windows 11. It copies only files that pass a JPEG signature check and a Windows image-decoding check, ignores small files, creates the destination folder, and uses SHA-256 hashes to avoid collecting the same image more than once.
Before you run it: Use Windows PowerShell or PowerShell on Windows. The script uses the Windows System.Drawing image decoder, so it is intended for Windows rather than macOS or Linux. Administrator access is not normally required.
Complete PowerShell script
$Source = Join-Path $env:LOCALAPPDATA 'Packages\Microsoft.Windows.ContentDeliveryManager_cw5n1h2txyewy\LocalState\Assets'
$Destination = Join-Path $env:USERPROFILE 'Pictures\Spotlight'
$MinimumBytes = 200KB

# Confirm that the lock-screen cache exists.
if (-not (Test-Path -LiteralPath $Source -PathType Container)) {
    Write-Warning "Spotlight cache not found: $Source"
    return
}

try {
    Add-Type -AssemblyName System.Drawing -ErrorAction Stop
    New-Item -ItemType Directory -Path $Destination -Force -ErrorAction Stop | Out-Null
}
catch {
    Write-Error "Could not prepare the image decoder or destination folder. $($_.Exception.Message)"
    return
}

# Remember hashes already saved, so repeated runs do not create duplicates.
$KnownHashes = [System.Collections.Generic.HashSet[string]]::new(
    [System.StringComparer]::OrdinalIgnoreCase
)

Get-ChildItem -LiteralPath $Destination -Filter '*.jpg' -File -ErrorAction SilentlyContinue |
    ForEach-Object {
        try {
            $hash = (Get-FileHash -LiteralPath $_.FullName -Algorithm SHA256 -ErrorAction Stop).Hash
            [void]$KnownHashes.Add($hash)
        }
        catch {
            Write-Warning "Could not hash existing file: $($_.Name)"
        }
    }

$Copied = 0
$Skipped = 0
$Duplicates = 0

try {
    $Files = Get-ChildItem -LiteralPath $Source -File -ErrorAction Stop
}
catch {
    Write-Error "Could not read the Spotlight cache. $($_.Exception.Message)"
    return
}

foreach ($File in $Files) {
    if ($File.Length -lt $MinimumBytes) {
        $Skipped++
        continue
    }

    $Stream = $null
    $Image = $null

    try {
        $Stream = [System.IO.File]::OpenRead($File.FullName)

        # A JPEG file starts with FF D8 FF.
        $Signature = New-Object byte[] 3
        if ($Stream.Read($Signature, 0, 3) -ne 3 -or
            $Signature[0] -ne 0xFF -or
            $Signature[1] -ne 0xD8 -or
            $Signature[2] -ne 0xFF) {
            $Skipped++
            continue
        }

        # Ask Windows to decode the image; a renamed non-image will fail here.
        $Stream.Position = 0
        $Image = [System.Drawing.Image]::FromStream($Stream, $true, $true)

        # Keep reasonably large landscape and portrait images.
        if ($Image.Width -lt 600 -or $Image.Height -lt 600) {
            $Skipped++
            continue
        }
    }
    catch {
        $Skipped++
        continue
    }
    finally {
        if ($Image) { $Image.Dispose() }
        if ($Stream) { $Stream.Dispose() }
    }

    try {
        $Hash = (Get-FileHash -LiteralPath $File.FullName -Algorithm SHA256 -ErrorAction Stop).Hash

        if (-not $KnownHashes.Add($Hash)) {
            $Duplicates++
            continue
        }

        $NewName = 'Spotlight-' + $Hash.Substring(0, 12) + '.jpg'
        $Target = Join-Path $Destination $NewName

        Copy-Item -LiteralPath $File.FullName -Destination $Target -ErrorAction Stop
        $Copied++
    }
    catch {
        Write-Warning "Could not copy $($File.Name): $($_.Exception.Message)"
    }
}

Write-Host "Finished. New JPEGs copied: $Copied"
Write-Host "Skipped (small, non-JPEG, or invalid): $Skipped"
Write-Host "Duplicates already collected: $Duplicates"
Write-Host "Saved images: $Destination"
How to run the script
- Open Start and search for PowerShell or Windows Terminal.
- Open PowerShell. You do not normally need to choose Run as administrator.
- Copy the complete script above, paste it into the PowerShell window, and press Enter.
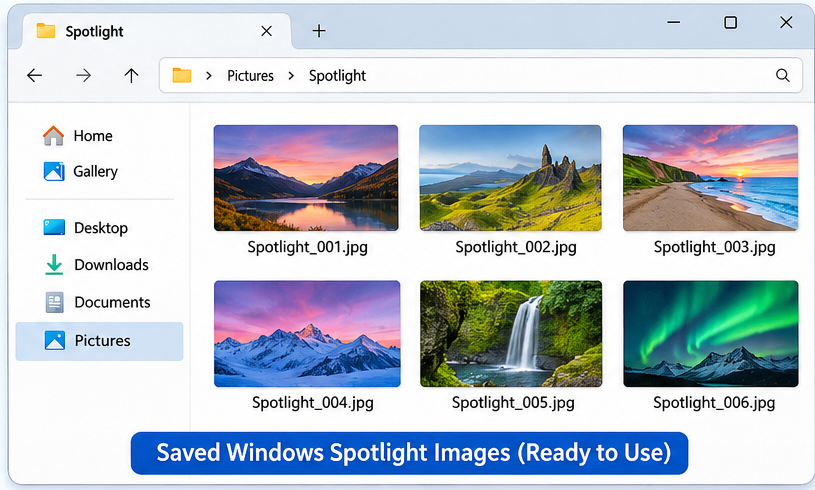
- Wait for the summary at the end. Open Pictures > Spotlight to view the saved JPEGs.
What the important commands do
Join-Pathbuilds the cache and destination paths using your Windows profile, rather than assuming a particular username.New-Item -ItemType Directory -Forcecreates the destination folder if it does not already exist.Get-ChildItemreads files from the cache. The script does not modify or move them.- The
FF D8 FFsignature check rejects files that do not begin like JPEGs.System.Drawing.Image.FromStreamthen attempts to decode the image instead of trusting its filename. Get-FileHash -Algorithm SHA256identifies duplicate image content, even when the original cache filenames differ.Copy-Itemsaves a verified copy with a.jpgextension. It does not convert the image; the extension simply identifies the JPEG data correctly.
The 200 KB and 600-pixel thresholds are practical filters, not official Microsoft requirements. They help exclude many icons and tiny previews while retaining common landscape and portrait photographs. If you want smaller images too, lower $MinimumBytes or the dimension checks. The script intentionally focuses on JPEG files; it will skip PNG or other formats rather than label them incorrectly.
Method 3: Automatically collect new Spotlight images with Task Scheduler
Spotlight changes its pictures over time, and cache contents can be refreshed. If you want to build a collection of Windows Spotlight images, run the PowerShell script periodically instead of waiting until a picture disappears. The hash check means that running it repeatedly will not create a second copy of an image already collected.
Save the script as a .ps1 file
- Open Notepad and paste the complete PowerShell script from the previous section.
- Save it in a folder you control, for example
%USERPROFILE%\Scripts\Save-SpotlightImages.ps1. Create the Scripts folder first if needed. - Run the saved script manually once to confirm that it works and that images appear in Pictures\Spotlight.
Create a scheduled task
- Press Windows + R, type
taskschd.msc, and press Enter. - In Task Scheduler, choose Create Basic Task and give it a name such as Save Windows Spotlight images.
- Choose a daily trigger. In the task’s properties, you can edit the trigger and set it to repeat every few hours if you want more frequent checks.
- Choose Start a program. For Program/script, enter
powershell.exe. - In Add arguments, enter
-NoProfile -File "C:\Users\YourName\Scripts\Save-SpotlightImages.ps1". ReplaceC:\Users\YourNamewith your actual Windows profile path and use the exact location where you saved the script. Do not leave the example username unchanged. - Save the task and test it with right-click > Run.
Run the task under the same Windows user account whose Spotlight cache you want to collect. A task running as SYSTEM or another account may look in a different profile and miss your images. For a personal PC, a task that runs only when you are signed in is a sensible starting point.
Know the limitation: Task Scheduler cannot recover a picture that Windows has already removed from its cache. It only collects files that exist when the script runs. If the PC is switched off, asleep, or the user is not signed in, a task configured for an interactive session may not run at the intended time. A few checks per day can reduce missed images, but cannot guarantee that every Spotlight picture will be captured.
Where are Windows 11 desktop Spotlight images stored?
Windows 11 desktop Spotlight can use a different cache from the traditional lock-screen Assets folder. If you are looking for Windows Spotlight images used as desktop wallpaper, check this section as well as the lock-screen cache. This is why the lock-screen folder may not contain the picture currently displayed behind your desktop icons. Microsoft explains the distinction between desktop and lock-screen background settings in its Windows background configuration documentation, which also describes how Spotlight works alongside managed background settings.
First, identify the wallpaper Windows is currently using
Press Windows + R, type regedit, and press Enter. Browse to HKEY_CURRENT_USER\Control Panel\Desktop and look for the WallPaper value. Read the value data to see whether it points to an image file. Do not edit the registry value. If it contains a usable file path, copy that file to Pictures\Spotlight before making any changes.
You can also read the value without opening Registry Editor. In PowerShell, run:
(Get-ItemProperty 'HKCU:\Control Panel\Desktop' -Name WallPaper).WallPaperCheck these Windows 11 locations if necessary
If the current wallpaper path does not help, these locations have been observed on some Windows 11 installations. They are implementation-dependent cache locations, not guaranteed public storage paths. Their contents can change between Windows builds and updates.
User-level cache:
%LOCALAPPDATA%\Packages\Microsoft.Windows.Client.CBS_cw5n1h2txyewy\LocalCache\Microsoft\IrisServiceSystem-level desktop Spotlight assets (if present and accessible):
C:\Windows\SystemApps\MicrosoftWindows.Client.CBS_cw5n1h2txyewy\DesktopSpotlight\Assets\ImagesBrowse these folders only to locate candidate images. Copy a candidate to your own Pictures folder before renaming or organizing it. If Windows displays Access denied for a protected SystemApps folder, do not take ownership of it or change its permissions just to retrieve a wallpaper. Use the user-level cache or the wallpaper path reported by Windows instead.
Troubleshooting Windows Spotlight image downloads
1. The Spotlight Assets folder is empty
If Windows Spotlight images are not appearing in the cache, first confirm that Windows Spotlight is selected under Settings > Personalization > Lock screen. Connect to the internet, temporarily check whether a VPN, firewall, proxy, or metered-connection setting is blocking downloads, and lock the PC with Windows + L. If you have just enabled Spotlight, wait for Windows to fetch its first images and check the folder again. Also make sure you are looking under the Windows account that displays the Spotlight picture.
2. Windows Spotlight is not downloading new pictures
Check that normal internet access works and that Windows Update is not waiting for a restart. If Spotlight is stuck, switch the lock-screen background to Picture, close Settings, restart Windows, and then select Windows spotlight again. On a work or school PC, an administrator policy may control Spotlight or prevent it from downloading content. Avoid deleting package folders or resetting app data until simpler checks have failed.
3. The image will not open after renaming it
Adding .jpg does not convert a file. Check the first bytes for the JPEG signature FF D8 FF, then try opening the copied file in Photos. If it is not a JPEG, is truncated, or fails image decoding, remove that copy from your collection and try another file. Do not rename every cache item in bulk.
4. File Explorer thumbnails are missing
Make sure File name extensions is enabled in File Explorer so you can see whether the file really ends in .jpg. Switch to Large icons view and check that the image opens in Photos. If valid images still show generic icons, restart File Explorer or restart Windows. You can also open File Explorer Options, use the View tab, and confirm that Always show icons, never thumbnails is not enabled.
5. Only small thumbnails appear
The Assets folder contains more than full-size wallpapers. Sort by Size and inspect the larger files first. The PowerShell script uses a minimum size and decoded dimensions to filter many small assets. If you still get only small images, check that Spotlight has had time to download full-size content and that you are inspecting the correct cache.
6. Portrait images appear instead of landscape wallpapers
Spotlight caches can include portrait-oriented images as well as landscape images. Check the dimensions in Photos or File Explorer and keep the orientation that suits your device. For a desktop monitor, choose a landscape image close to your screen’s aspect ratio. For a phone, a portrait image may be the better fit. The script keeps both orientations when they meet its minimum dimensions.
7. Spotlight keeps showing the same picture
Confirm that Windows Spotlight is still selected and that the PC can reach the internet. If the image does not change after some time, switch to Picture and then back to Windows spotlight. Check for organization policies that restrict consumer experiences. Spotlight does not promise a new image at a fixed hour, so a picture remaining for a while does not automatically mean the feature is broken.
8. PowerShell reports an error
Check that you pasted the complete script and that the source path exists. If the error mentions System.Drawing, run the script in Windows PowerShell or a supported Windows PowerShell environment where the System.Drawing assembly is available. If the error says Access denied, check that the files are in your own user cache and that your destination folder is writable. You do not need to change permissions on Windows system folders for the lock-screen method.
9. Windows Spotlight is missing from Settings
Check Windows edition and updates, then restart the PC and open Personalization again. On managed work or school devices, Group Policy or mobile-device management can hide or disable Spotlight choices. If the option is still missing, check with your administrator before changing policy or re-registering Windows apps. Do not download random registry files or scripts that claim to restore Spotlight.
How to use and organize your saved Spotlight images
Set a saved image as your desktop wallpaper
After saving Windows Spotlight images, open Pictures\Spotlight, right-click the JPEG you want, and select Set as desktop background. Alternatively, open Settings > Personalization > Background, choose Picture, and browse to the saved image.
Use a saved image on the lock screen
Open Settings > Personalization > Lock screen. Change the background from Windows spotlight to Picture, choose Browse photos, and select your saved image. Windows 10 uses the same Personalization > Lock screen area, with the background selector labelled Background.
Keep the original quality and organize your collection
- Keep the original copied JPEG rather than taking a screenshot of the lock screen.
- Use folders such as Landscape, Portrait, Nature, and Architecture if your collection grows.
- Keep a backup on an external drive or trusted cloud storage.
- Avoid repeatedly saving resized versions over the original file.
- Choose a wallpaper resolution close to your display resolution to reduce unnecessary scaling or cropping.
Can you use Spotlight images commercially?
Saving a picture for your own Windows wallpaper is different from publishing it, redistributing it, or using it in a commercial design. Spotlight images may be supplied under rights held by Microsoft or third-party photographers and licensors. Do not assume that a picture is copyright-free just because Windows downloaded it. Check the applicable rights and permissions before using an image in a website, advertisement, product, or resale collection.
Frequently asked questions
Where are Windows Spotlight images saved in Windows 10?
The commonly used lock-screen cache is %LOCALAPPDATA%\Packages\Microsoft.Windows.ContentDeliveryManager_cw5n1h2txyewy\LocalState\Assets. It is inside the current user’s local AppData package folder.
Where are Windows Spotlight images saved in Windows 11?
For lock-screen Spotlight, start with the ContentDeliveryManager Assets folder. Desktop Spotlight may use separate, build-dependent locations, including the user-level IrisService cache. Check the current wallpaper path before assuming both features use the same folder.
Why do Windows Spotlight files have no extension?
The cache is managed by Windows and does not need to present every asset as a user-facing image file. Files without extensions may be JPEGs, but the folder can also contain thumbnails and other data. Verify the format before renaming a copy.
Does adding .jpg convert a Spotlight file into a JPEG?
No. A filename extension does not change the file’s contents. It only tells Windows and other applications what format to expect. The file must already contain valid JPEG data to work correctly with a .jpg extension.
Can I recover a Spotlight image after Windows changes it?
Possibly, if Windows still has a copy in its cache. Check the relevant lock-screen or desktop cache and copy the image as soon as you find it. If Windows has removed the file and you did not save a copy, there is no guarantee that it can be recovered from the PC.
Can I download Windows Spotlight images without an app?
Yes. File Explorer and PowerShell are enough. The manual method is suitable for a few pictures, while the PowerShell script is useful for filtering and collecting many files.
Will the PowerShell script delete or change the original Spotlight cache?
No. It reads the source files and copies verified JPEGs into Pictures\Spotlight. It does not move, rename, or delete files in the original cache.
Final thoughts
Saving Windows Spotlight images makes it easier to keep the backgrounds you like, even after Windows rotates to a new picture. Keeping a favourite image takes a little extra work. For a quick save, copy a candidate from the Assets folder and verify its format. If you want to build a collection, use the PowerShell script and schedule it to check the cache regularly. The key is to work with copies, validate the image data, and leave Windows’ original cache alone.
If you run into a different Spotlight error or find that a cache path has changed on your Windows build, share the Windows version and the exact error in the comments. That makes it easier to narrow down the cause without risking your Windows installation.


Thanks for this information.